

Putting your computer in safe mode is important in case of malfunctions. This function allows you to start Windows with only basic drivers and files so that the user can correct whatever is causing conflicts. There are two ways to do it. See below what they are and how to start Windows 11 in safe mode.
From PC settings
To put Windows 11 in safe mode, you need to keep in mind which operating system features you want to use.
If you need internet access, the last step of the tutorial below requires attention to which key to press. See more details in the step-by-step below.
- The first step to start Windows 11 in safe mode is to open the settings panel located on the taskbar. If the button is not visible, look in the search bar of the start menu;
- With the settings panel open, in the “ System ” tab, look for the “ Recovery ” menu and click to open;
- In the “ Advanced Boot ” menu, click on the “ Restart Now ” button to access the operating system recovery menu;
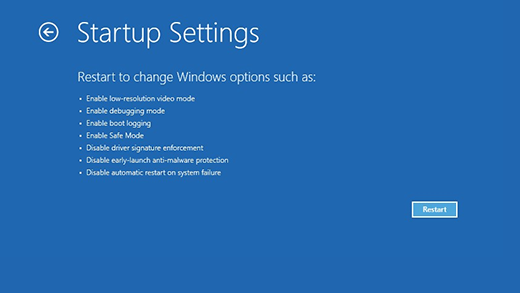
- After the computer has restarted, select “ Troubleshoot ”, go to “ Advanced Options ”, “ Startup Settings ” and finally “ Restart ”;
- Once your computer restarts, you will see a list of options. Press 4 or F4 to start the computer in safe mode or 5 and F5 to start in Network mode if you need internet access.
Okay, now you know how to start Windows 11 in safe mode from the operating system settings.
In this mode, the device ensures that you access only the most essential of drivers and other tools. Thus, it is possible to prevent the loading of malicious software and conflicting applications, for example.
If you prefer to do otherwise, you can access the mode from the PC login screen. See how in the topic below.
On the login screen
This method can be useful for those who, for some reason, are unable to access the system settings menu. For this:
- On login screen, press and hold the “Shift” key while selecting the “Power” button and then click on “Restart”
- After the computer has restarted, select “Troubleshoot”, go to “Advanced Options”, “Startup Settings” and finally “Restart”.
- Once the computer has restarted, you will see a list of options. Press 4 or F4 to start the computer in safe mode or 5 and F5 to start in Network mode if you need internet access.
Ready! As you can see, the method is very similar to the one mentioned in the previous topic and has the same purpose. However, with a few steps less.
Restarting the device should be enough for Windows 11 to start again in a conventional way after all this process. However, if it doesn’t, you have to manually disable it in the system boot settings.
See how below!
Starting Windows 11 Normally
- To disable the boot options, open the “ Run ” tool by pressing the “ Windows + R “ keys;
- Once the tool is open type “ msconfig ” (without quotes) to open the boot and Enter the menu;
- Finally, go to the “ System Boot ” tab and uncheck the “ Safe Boot ” checkbox.
That’s it! Just restart the computer one more time to check if everything went well.